> ## Documentation Index
> Fetch the complete documentation index at: https://docs.scanova.io/llms.txt
> Use this file to discover all available pages before exploring further.
# Building a form
> Creating a form, question types, and settings.
Forms let you collect information from the people who scan your QR code or visit your landing page. You build a form the same way you build a landing page — a block-based canvas with a live mobile preview — but a form's canvas is limited to question blocks plus a header, a submit button, and an optional skip button.
## Navigating to Forms
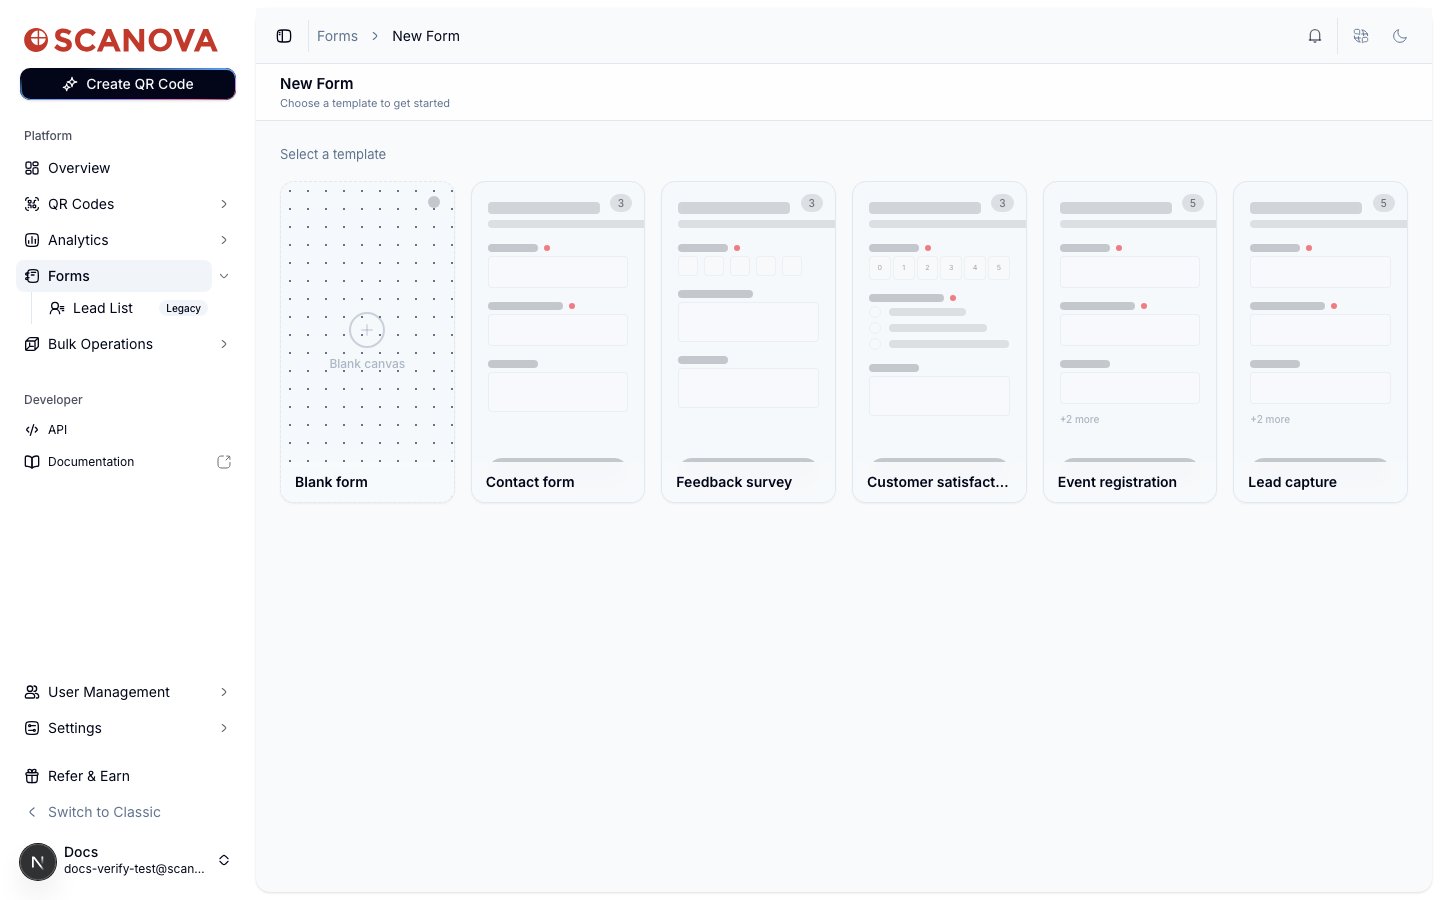
From the left sidebar, click **Forms**. This opens your forms list, showing every form's name, response count, linked QR codes, and creation date.
The sidebar also shows a **Lead List** item under Forms, tagged **Legacy**. Lead List is the deprecated predecessor to Forms — it still works, but new forms should use the Forms builder described here.
## Creating a form
From the forms list, click **New Form** in the top right.
Pick one of six templates:
* **Blank form** — start from an empty canvas
* **Contact form** — Full Name, Email, and Message
* **Feedback survey**
* **Customer satisfaction**
* **Event registration**
* **Lead capture**
 The Contact form template's three questions are **Full Name**, **Email**, and **Message** only — there is no phone field. If you need to collect a phone number, add a **Phone Number** question block yourself.
Selecting a template opens the form builder immediately, with the template's blocks already on the canvas.
The Contact form template's three questions are **Full Name**, **Email**, and **Message** only — there is no phone field. If you need to collect a phone number, add a **Phone Number** question block yourself.
Selecting a template opens the form builder immediately, with the template's blocks already on the canvas.
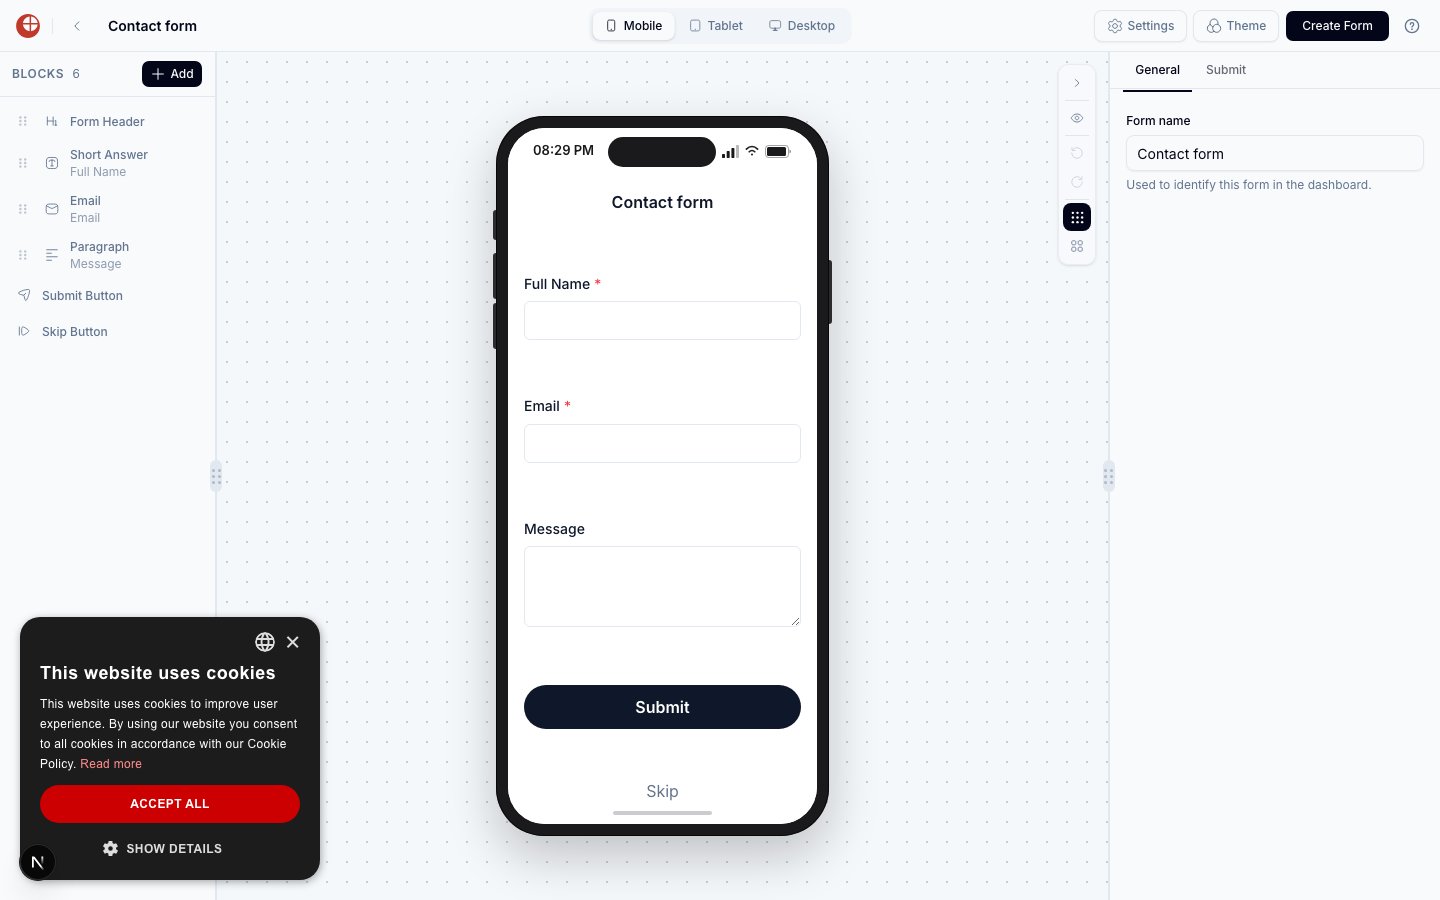 Every form — regardless of template — is built from the same six-slot shape: a **Form Header**, one or more question blocks, a **Submit Button**, and an optional **Skip Button**. See [Skip button & form gates](/forms/skip-button-and-gates) for how Skip actually works.
## Adding and reordering questions
* Click **Add** above the BLOCKS list to open the question picker.
* Drag the handle on the left of any block in the BLOCKS list to reorder it.
* Click a block to select it and edit its Content/Design fields in the right panel.
* Select a block and click its trash icon to delete it.
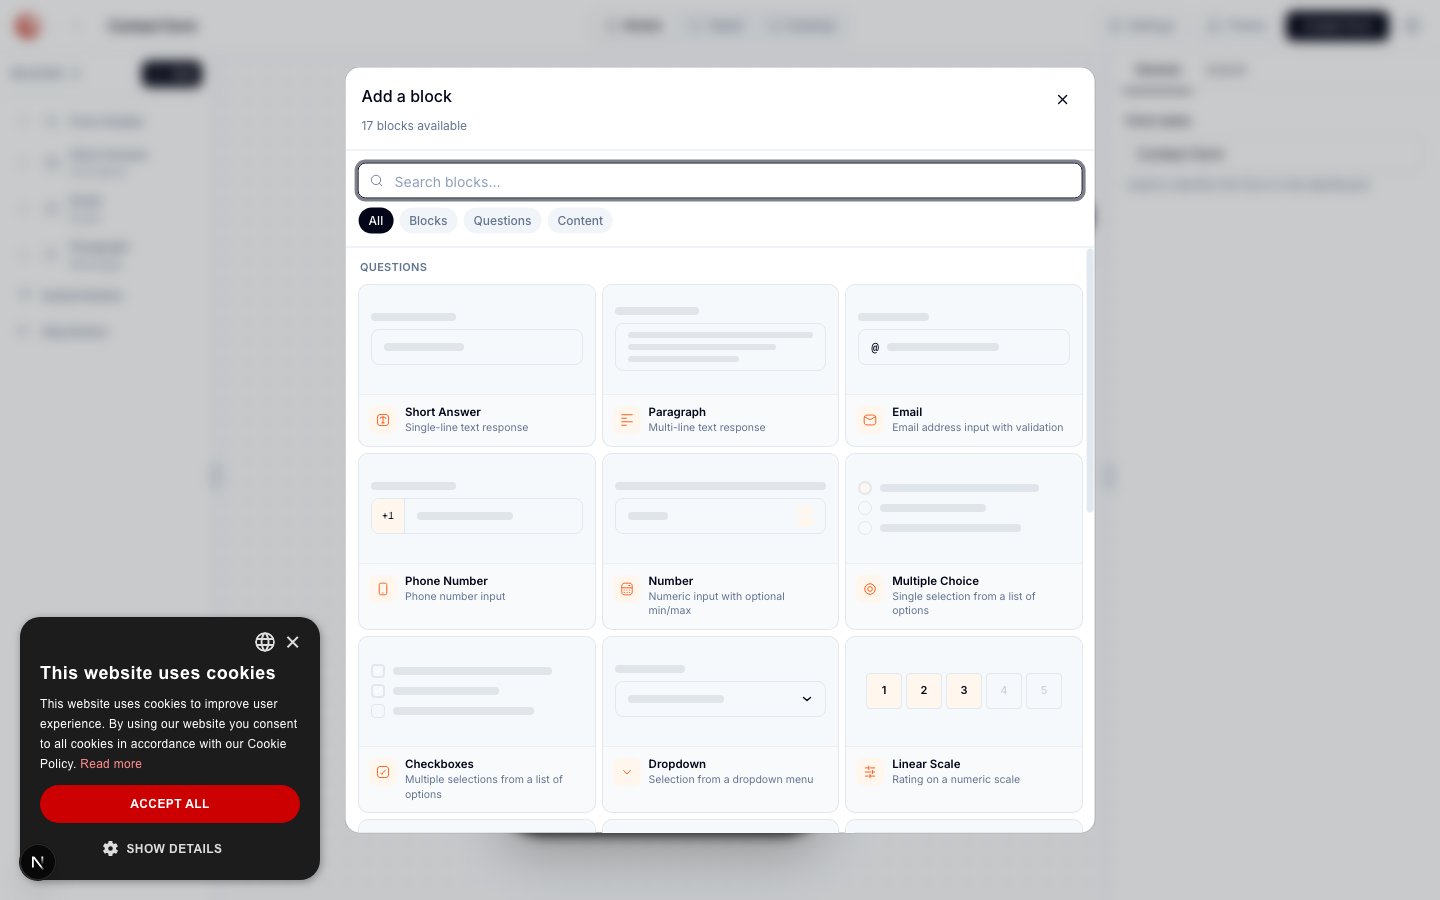
The picker groups blocks into four tabs — **All**, **Blocks**, **Questions**, and **Content** — and reports how many are still available to add (form-level blocks like Form Header, Submit Button, and Skip Button can only be added once each, so they drop out of the count once used).
Every form — regardless of template — is built from the same six-slot shape: a **Form Header**, one or more question blocks, a **Submit Button**, and an optional **Skip Button**. See [Skip button & form gates](/forms/skip-button-and-gates) for how Skip actually works.
## Adding and reordering questions
* Click **Add** above the BLOCKS list to open the question picker.
* Drag the handle on the left of any block in the BLOCKS list to reorder it.
* Click a block to select it and edit its Content/Design fields in the right panel.
* Select a block and click its trash icon to delete it.
The picker groups blocks into four tabs — **All**, **Blocks**, **Questions**, and **Content** — and reports how many are still available to add (form-level blocks like Form Header, Submit Button, and Skip Button can only be added once each, so they drop out of the count once used).
 ## Question types
The Questions tab offers 16 question types:
| Type | When to use |
| ------------------- | ------------------------------------------ |
| **Short Answer** | Single-line text (name, city, code) |
| **Paragraph** | Multi-line free text (feedback, comments) |
| **Email** | Validated email address |
| **Phone Number** | Phone number input |
| **Number** | Numeric input with optional min/max |
| **Multiple Choice** | Single selection from a list of options |
| **Checkboxes** | Multiple selections from a list of options |
| **Dropdown** | Selection from a dropdown menu |
| **Linear Scale** | Rating on a numeric scale (e.g. 1–5) |
| **Date** | Date picker |
| **Time** | Time picker |
| **Star Rating** | Rating using star icons |
| **Emoji Rating** | Rating using emoji faces |
| **Like / Dislike** | Thumbs up or thumbs down rating |
| **File Upload** | Respondent uploads a file |
| **Signature** | Digital signature pad |
The **Content** tab has one additional non-question block, **Description** — a rich-text paragraph with formatting, links, and images, for adding instructions or context between questions.
## Form settings
The right panel has two tabs at the form level: **General** and **Submit**.
### General
| Setting | What it does |
| ------------- | ----------------------------------------------------------------------------- |
| **Form name** | Internal label shown in the dashboard's forms list — not shown to respondents |
### Submit
Configure the submit button label, a receiver email for response notifications, and after-submission behavior (show a message or redirect to a URL).
There is no separate "Skip" tab in form settings. Skip is a canvas block, not a settings toggle — see [Skip button & form gates](/forms/skip-button-and-gates).
## Saving changes
Changes auto-save as you edit — the header shows a live **Saving…**/**Saved** indicator. The primary header button reads **Create Form** before the form's first save, and updates to **Update Form** afterward.
## Linking a form to a QR code
A form only starts collecting responses once it's linked to a QR code. Open the QR code's **Settings** tab and turn on **Capture Leads**, then choose **Capture using Forms** and link your form. The [Skip button & form gates](/forms/skip-button-and-gates) page covers this flow — including the display style, timing, and expiry rules — in detail.
## Where to go next
* [Skip button & form gates](/forms/skip-button-and-gates) — configuring the Skip button and how a linked form gates your landing page.
* [Viewing & exporting responses](/forms/responses) — the response viewer, analytics, and export.
## Related
* [Viewing & exporting responses](/forms/responses) — where a form's submissions end up once it's collecting data.
* [Skip button & form gates](/forms/skip-button-and-gates) — linking this form to a QR code and configuring how it's gated.
* [Page Builder overview](/page-builder/overview) — the block-based landing page editor this form builder is modeled on.
## Question types
The Questions tab offers 16 question types:
| Type | When to use |
| ------------------- | ------------------------------------------ |
| **Short Answer** | Single-line text (name, city, code) |
| **Paragraph** | Multi-line free text (feedback, comments) |
| **Email** | Validated email address |
| **Phone Number** | Phone number input |
| **Number** | Numeric input with optional min/max |
| **Multiple Choice** | Single selection from a list of options |
| **Checkboxes** | Multiple selections from a list of options |
| **Dropdown** | Selection from a dropdown menu |
| **Linear Scale** | Rating on a numeric scale (e.g. 1–5) |
| **Date** | Date picker |
| **Time** | Time picker |
| **Star Rating** | Rating using star icons |
| **Emoji Rating** | Rating using emoji faces |
| **Like / Dislike** | Thumbs up or thumbs down rating |
| **File Upload** | Respondent uploads a file |
| **Signature** | Digital signature pad |
The **Content** tab has one additional non-question block, **Description** — a rich-text paragraph with formatting, links, and images, for adding instructions or context between questions.
## Form settings
The right panel has two tabs at the form level: **General** and **Submit**.
### General
| Setting | What it does |
| ------------- | ----------------------------------------------------------------------------- |
| **Form name** | Internal label shown in the dashboard's forms list — not shown to respondents |
### Submit
Configure the submit button label, a receiver email for response notifications, and after-submission behavior (show a message or redirect to a URL).
There is no separate "Skip" tab in form settings. Skip is a canvas block, not a settings toggle — see [Skip button & form gates](/forms/skip-button-and-gates).
## Saving changes
Changes auto-save as you edit — the header shows a live **Saving…**/**Saved** indicator. The primary header button reads **Create Form** before the form's first save, and updates to **Update Form** afterward.
## Linking a form to a QR code
A form only starts collecting responses once it's linked to a QR code. Open the QR code's **Settings** tab and turn on **Capture Leads**, then choose **Capture using Forms** and link your form. The [Skip button & form gates](/forms/skip-button-and-gates) page covers this flow — including the display style, timing, and expiry rules — in detail.
## Where to go next
* [Skip button & form gates](/forms/skip-button-and-gates) — configuring the Skip button and how a linked form gates your landing page.
* [Viewing & exporting responses](/forms/responses) — the response viewer, analytics, and export.
## Related
* [Viewing & exporting responses](/forms/responses) — where a form's submissions end up once it's collecting data.
* [Skip button & form gates](/forms/skip-button-and-gates) — linking this form to a QR code and configuring how it's gated.
* [Page Builder overview](/page-builder/overview) — the block-based landing page editor this form builder is modeled on.