> ## Documentation Index
> Fetch the complete documentation index at: https://docs.scanova.io/llms.txt
> Use this file to discover all available pages before exploring further.
# Skip button & form gates
> Configuring a skip option and form gates.
An earlier version of this page implied Skip was a Settings toggle. It isn't — Skip is an addable/removable canvas block, just like a question block. This page also covers "form gates": the display rules that control how a linked form appears over your QR code's landing page.
## The Skip button
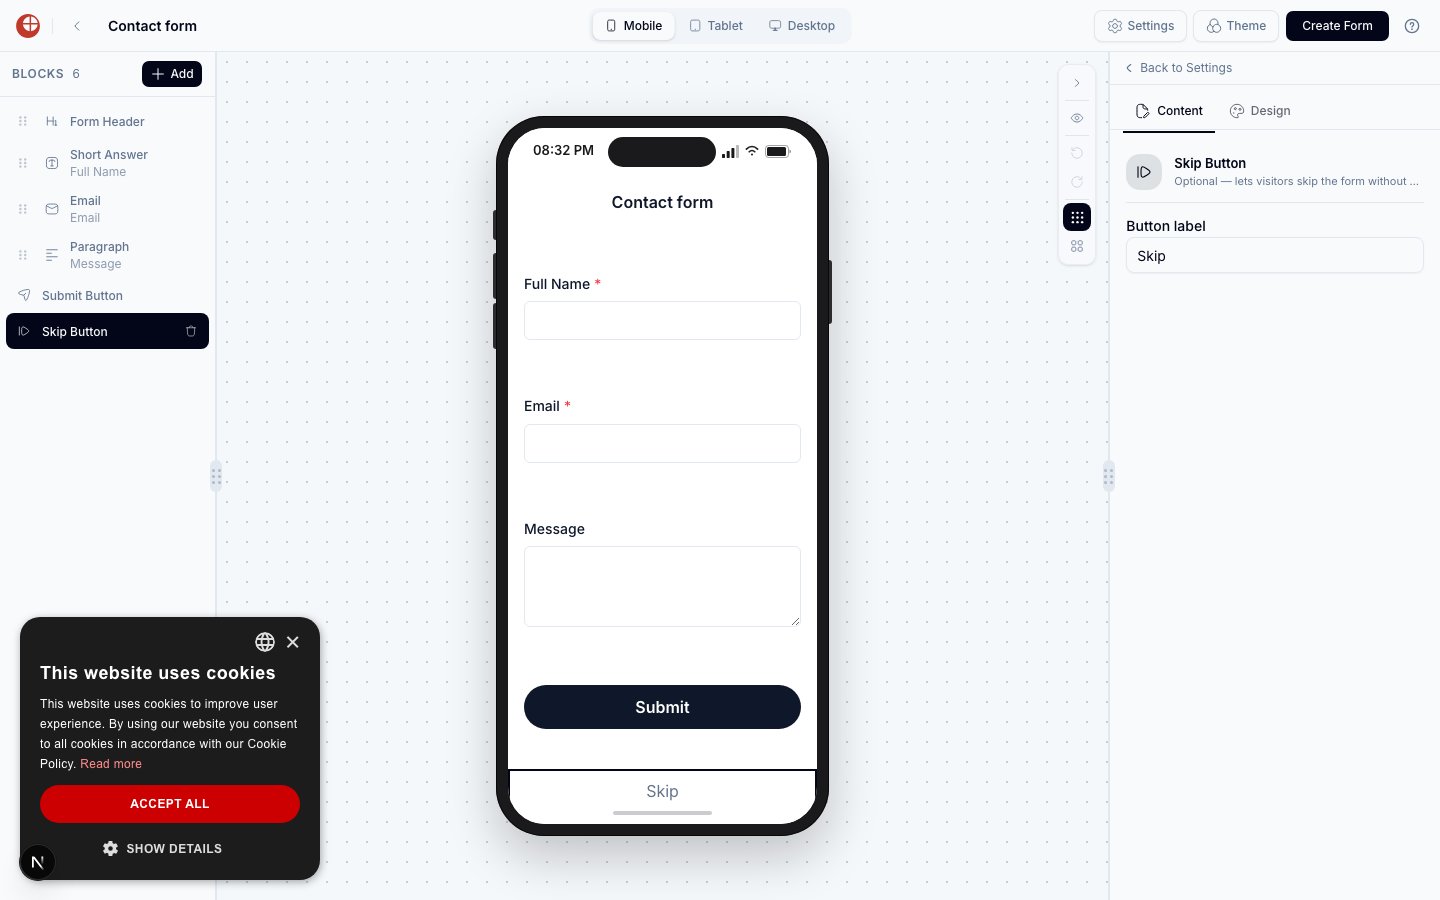
**Skip Button** is one of the non-question blocks available from the **Add a block** picker (alongside Form Header and Submit Button). Like those two, it can only be added once per form.
* The **Contact form** template ships with a Skip Button block already on the canvas by default.
* The **Blank form** template does not include one — add it yourself from the block picker if you want it.
* To remove Skip entirely, select the block in the BLOCKS list and delete it, the same way you'd delete a question block.
Selecting the block shows its Content tab with a single field, **Button label** (default: "Skip"), plus a Design tab for styling it.
 Respondents who tap Skip move past the form without submitting an answer — their attempt is recorded as **Skipped** in the [response viewer](/forms/responses) rather than counted as a completed response.
## Form gates: linking a form to a QR code
A form only starts collecting responses once it's linked to a QR code, and that link is configured from the QR code's own settings — not from the form builder.
Open a QR code and go to its **Settings** tab. Under **Tracking & Analytics**, turn on **Capture Leads**.
Two options appear: **Capture using Forms** (marked *Recommended*) and **Use Existing Lead List** (marked deprecated, with a note suggesting migration to Forms).
Respondents who tap Skip move past the form without submitting an answer — their attempt is recorded as **Skipped** in the [response viewer](/forms/responses) rather than counted as a completed response.
## Form gates: linking a form to a QR code
A form only starts collecting responses once it's linked to a QR code, and that link is configured from the QR code's own settings — not from the form builder.
Open a QR code and go to its **Settings** tab. Under **Tracking & Analytics**, turn on **Capture Leads**.
Two options appear: **Capture using Forms** (marked *Recommended*) and **Use Existing Lead List** (marked deprecated, with a note suggesting migration to Forms).
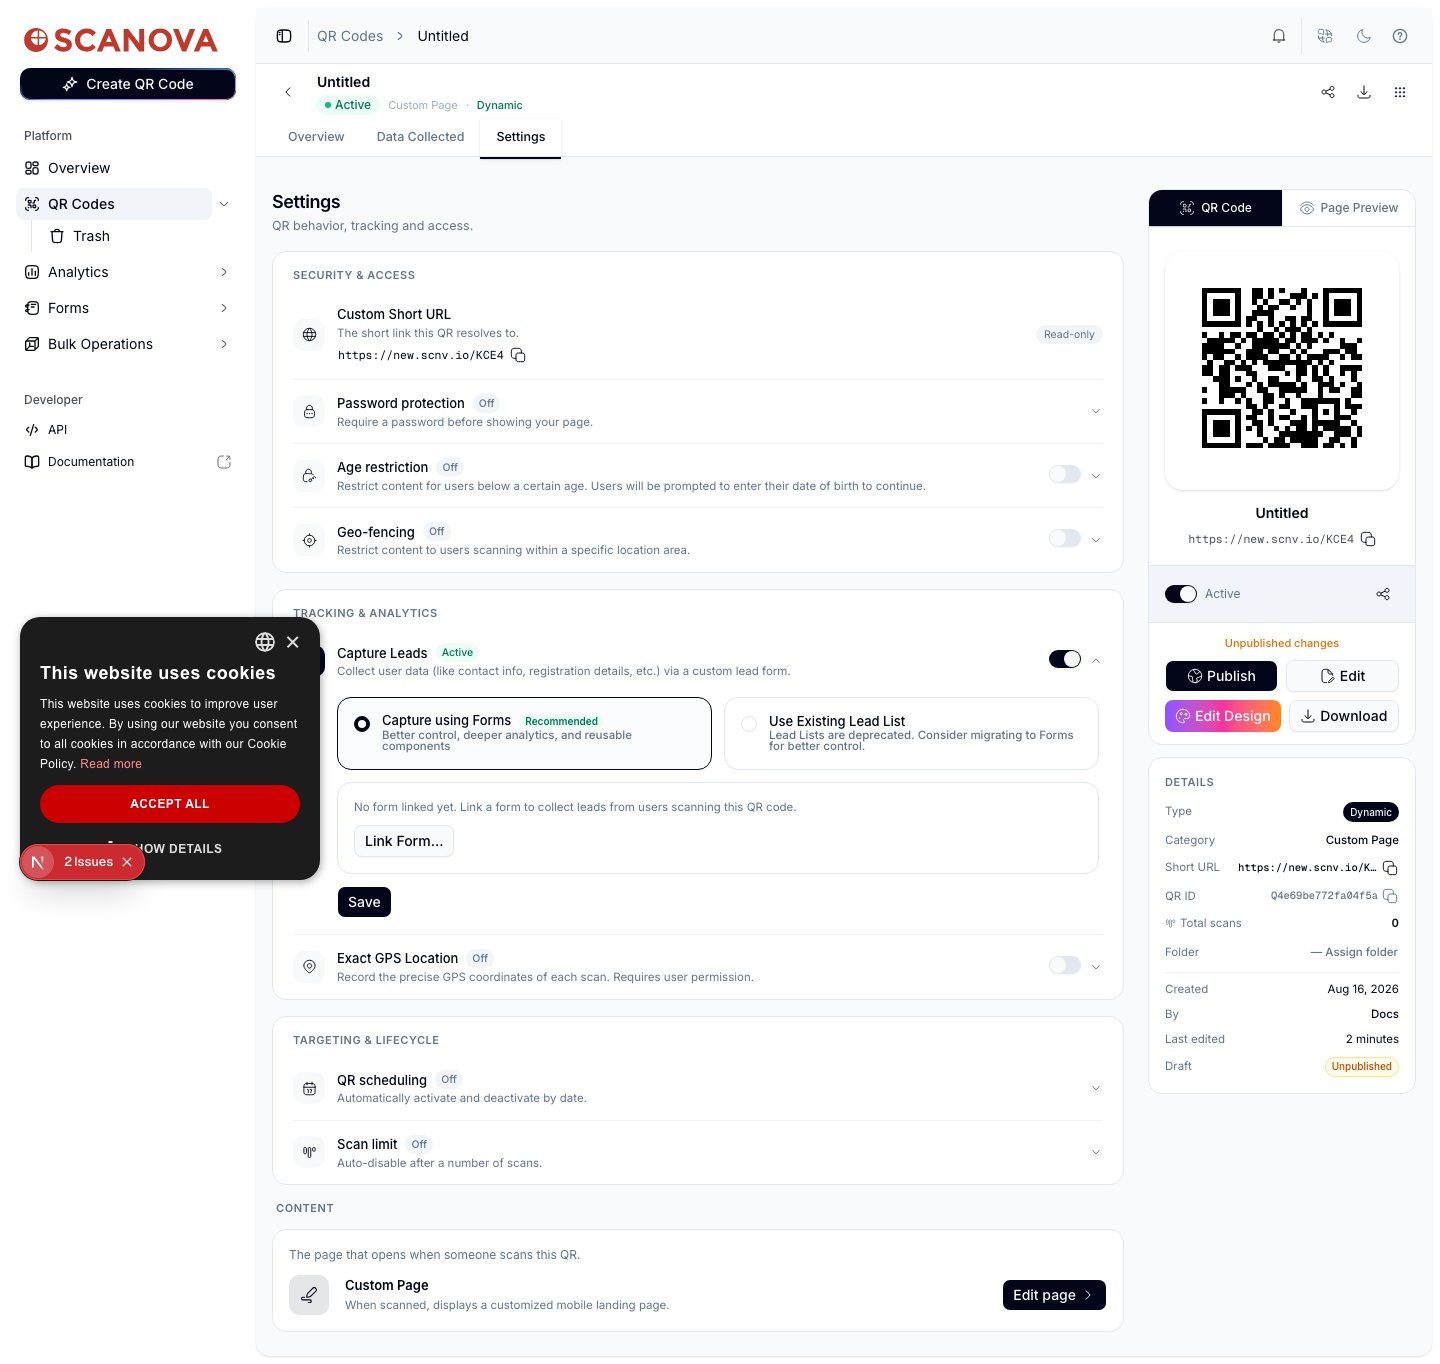 With **Capture using Forms** selected, click **Link Form…**. This opens the **Link Form** panel, where you choose which form to attach and how it's gated.
Pick how the form appears over your landing page:
* **Page Takeover** — the form replaces the whole page
* **Modal Popup** — the form appears in a centered dialog over the page
* **Slide-in Panel** — the form slides in from the edge of the screen
With **Capture using Forms** selected, click **Link Form…**. This opens the **Link Form** panel, where you choose which form to attach and how it's gated.
Pick how the form appears over your landing page:
* **Page Takeover** — the form replaces the whole page
* **Modal Popup** — the form appears in a centered dialog over the page
* **Slide-in Panel** — the form slides in from the edge of the screen
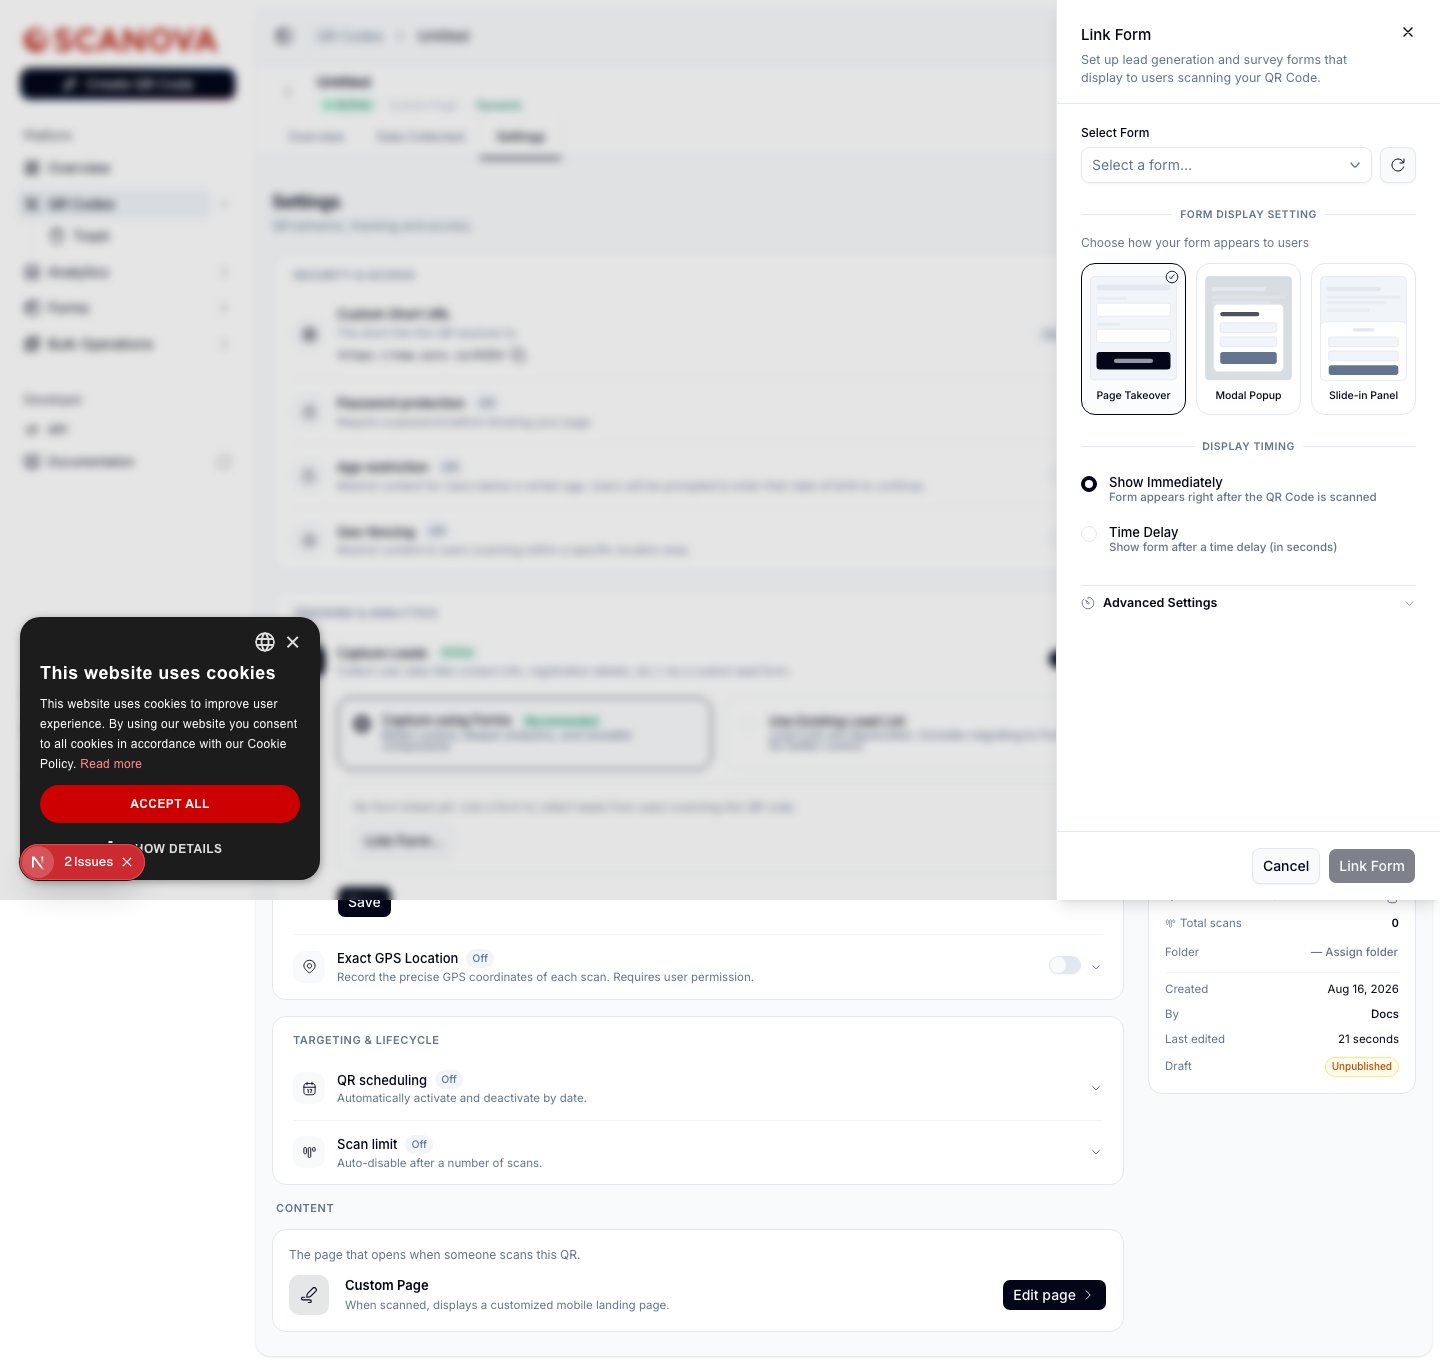 Under **Display Timing**, choose **Show Immediately** (the form appears right after the QR code is scanned) or **Time Delay** (show the form after a delay, in seconds).
Expand **Advanced Settings** for three additional gates, each behind its own toggle:
* **Form Expiry Rules** — stop showing the form to everyone once a limit is reached. Choose **Expiry by lead count** (a numeric threshold) or **Expiry by date & time**.
* **User-Based Display Rule** — control repeat visibility per visitor (only one option can be active at a time).
* **Match QR Code Theme** — show the form using the QR code's own theme instead of a default style.
Under **Display Timing**, choose **Show Immediately** (the form appears right after the QR code is scanned) or **Time Delay** (show the form after a delay, in seconds).
Expand **Advanced Settings** for three additional gates, each behind its own toggle:
* **Form Expiry Rules** — stop showing the form to everyone once a limit is reached. Choose **Expiry by lead count** (a numeric threshold) or **Expiry by date & time**.
* **User-Based Display Rule** — control repeat visibility per visitor (only one option can be active at a time).
* **Match QR Code Theme** — show the form using the QR code's own theme instead of a default style.
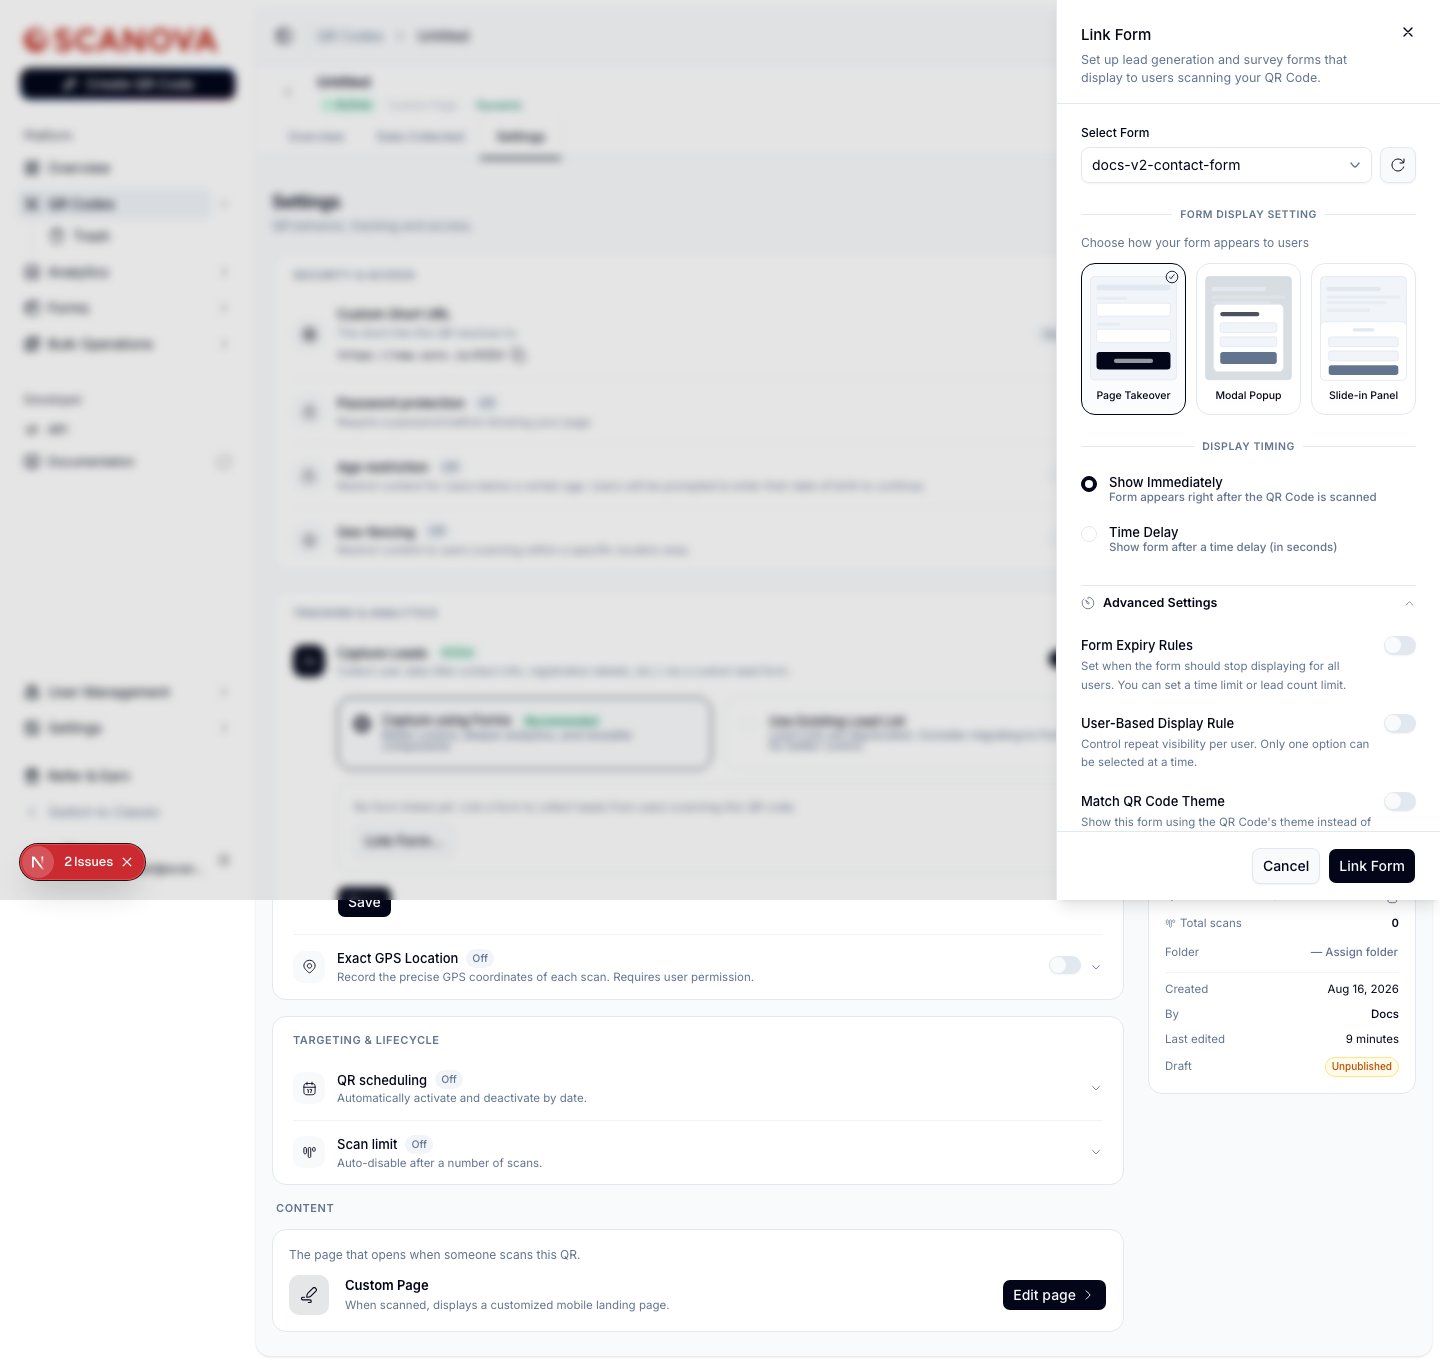 Click **Link Form** at the bottom of the panel. The QR code's **Capture Leads** section collapses back to show the link as **Active**, and the form's own **Linked QR Codes** tab (see [Viewing & exporting responses](/forms/responses)) lists the QR code you just linked.
A form can be linked to more than one QR code. Manage all of a form's links from its own **Linked QR Codes** tab, or unlink a single QR code from that QR code's own **Capture Leads** settings.
## Where to go next
* [Building a form](/forms/building-a-form) — templates, question types, and form settings.
* [Viewing & exporting responses](/forms/responses) — the response viewer, analytics, and export.
## Related
* [Building a form](/forms/building-a-form) — templates, question types, and form settings.
* [Viewing & exporting responses](/forms/responses) — where Skipped attempts and completed submissions show up.
* [Leads & lead lists](/leads/lead-lists) — the deprecated "Use Existing Lead List" alternative to Capture using Forms.
Click **Link Form** at the bottom of the panel. The QR code's **Capture Leads** section collapses back to show the link as **Active**, and the form's own **Linked QR Codes** tab (see [Viewing & exporting responses](/forms/responses)) lists the QR code you just linked.
A form can be linked to more than one QR code. Manage all of a form's links from its own **Linked QR Codes** tab, or unlink a single QR code from that QR code's own **Capture Leads** settings.
## Where to go next
* [Building a form](/forms/building-a-form) — templates, question types, and form settings.
* [Viewing & exporting responses](/forms/responses) — the response viewer, analytics, and export.
## Related
* [Building a form](/forms/building-a-form) — templates, question types, and form settings.
* [Viewing & exporting responses](/forms/responses) — where Skipped attempts and completed submissions show up.
* [Leads & lead lists](/leads/lead-lists) — the deprecated "Use Existing Lead List" alternative to Capture using Forms.