> ## Documentation Index
> Fetch the complete documentation index at: https://docs.scanova.io/llms.txt
> Use this file to discover all available pages before exploring further.
# Creating your first QR code
> A complete walkthrough: log in, choose Quick Code, and publish a Website URL QR code.
This walkthrough creates the simplest possible QR code — a **Quick Code** that redirects to a website URL — from a fresh login to a published, scannable code.
Go to your Scanova login page and sign in with your email and password (or Google/SSO). You land on the **Overview** dashboard at `/overview`.
Click **Create QR Code** at the top of the sidebar, or navigate to `/qr/create`. This hub presents three starting points as cards:
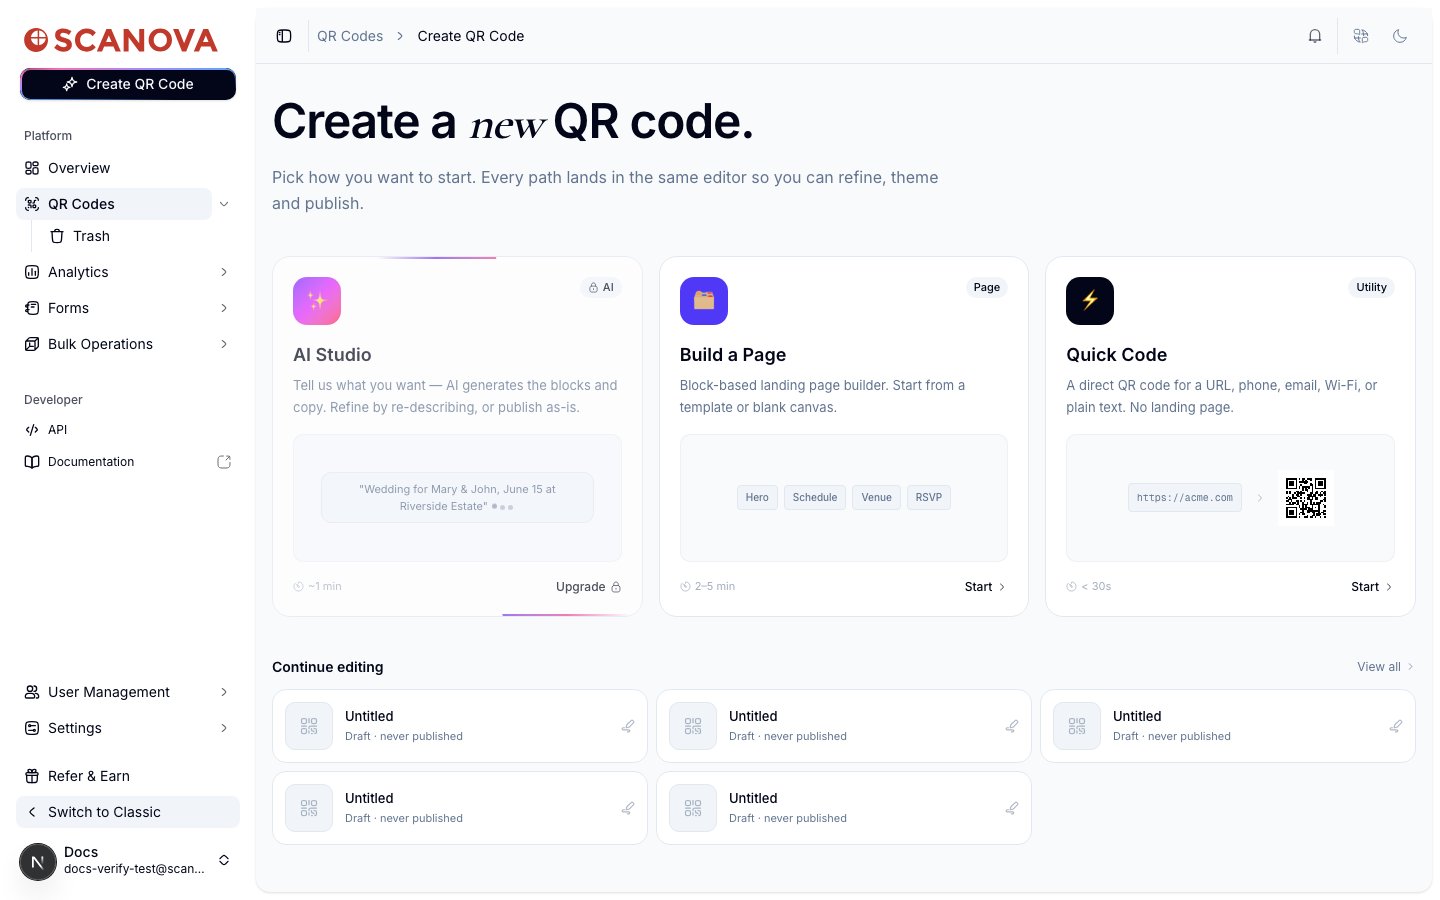 * **AI Studio** — describe a page and let AI generate it (see [AI QR / AI Studio](/qr-codes/create/ai-qr); this card shows **Upgrade** rather than **Start** on plans that don't include it).
* **Build a Page** — the block-based landing page builder, starting from a template or blank canvas.
* **Quick Code** — a direct QR code for a URL, phone number, email, Wi-Fi, or plain text, with no landing page.
For this walkthrough, click **Start** on the **Quick Code** card.
Quick Code opens a grid of direct-action types — **Website URL**, **Google Maps**, **App Store**, **App Deep Link**, and **GS1** support Dynamic QR codes, while **Phone Call**, **Email**, **Text Message**, **Wi-Fi**, **Plain Text**, **Event Calendar**, and **Contact Card** are Static-only.
* **AI Studio** — describe a page and let AI generate it (see [AI QR / AI Studio](/qr-codes/create/ai-qr); this card shows **Upgrade** rather than **Start** on plans that don't include it).
* **Build a Page** — the block-based landing page builder, starting from a template or blank canvas.
* **Quick Code** — a direct QR code for a URL, phone number, email, Wi-Fi, or plain text, with no landing page.
For this walkthrough, click **Start** on the **Quick Code** card.
Quick Code opens a grid of direct-action types — **Website URL**, **Google Maps**, **App Store**, **App Deep Link**, and **GS1** support Dynamic QR codes, while **Phone Call**, **Email**, **Text Message**, **Wi-Fi**, **Plain Text**, **Event Calendar**, and **Contact Card** are Static-only.
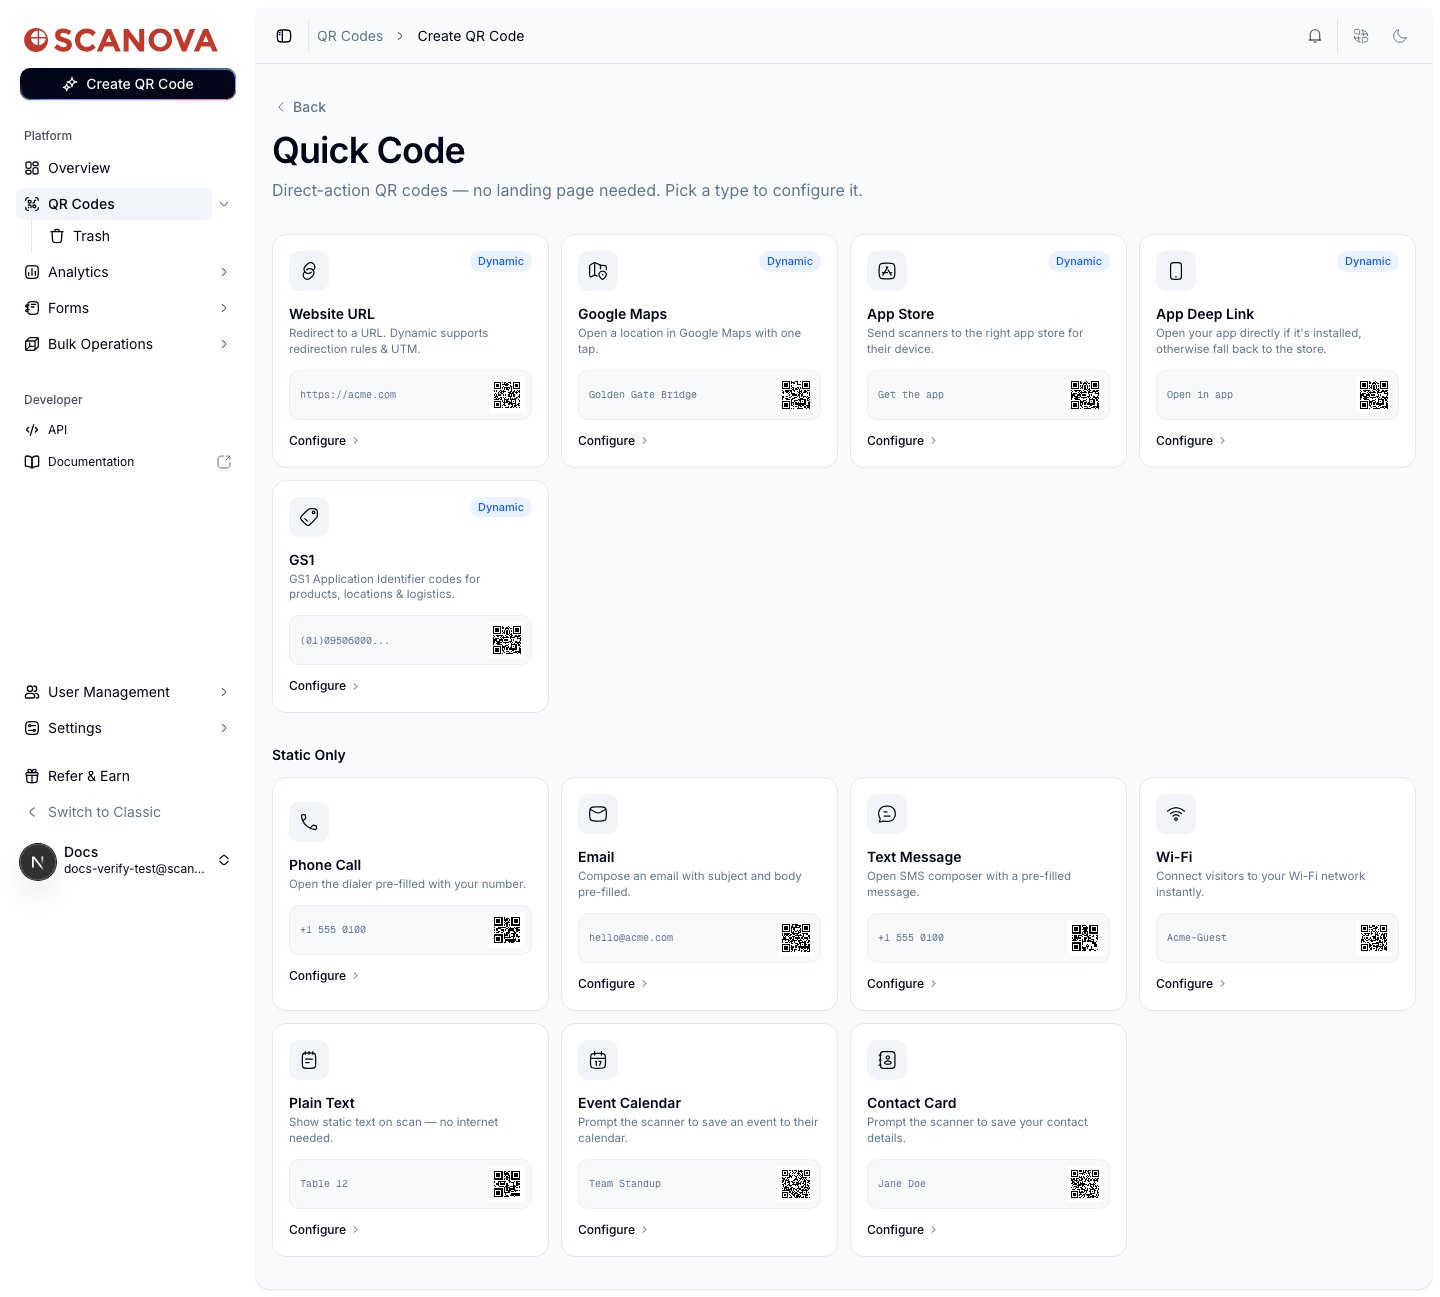 Click **Configure** under **Website URL**. This opens the form at `/qr/quick/url`.
Enter the destination address in the **URL** field (the `https://` prefix is fixed, so type just the rest, e.g. `example.com`).
Click **Configure** under **Website URL**. This opens the form at `/qr/quick/url`.
Enter the destination address in the **URL** field (the `https://` prefix is fixed, so type just the rest, e.g. `example.com`).
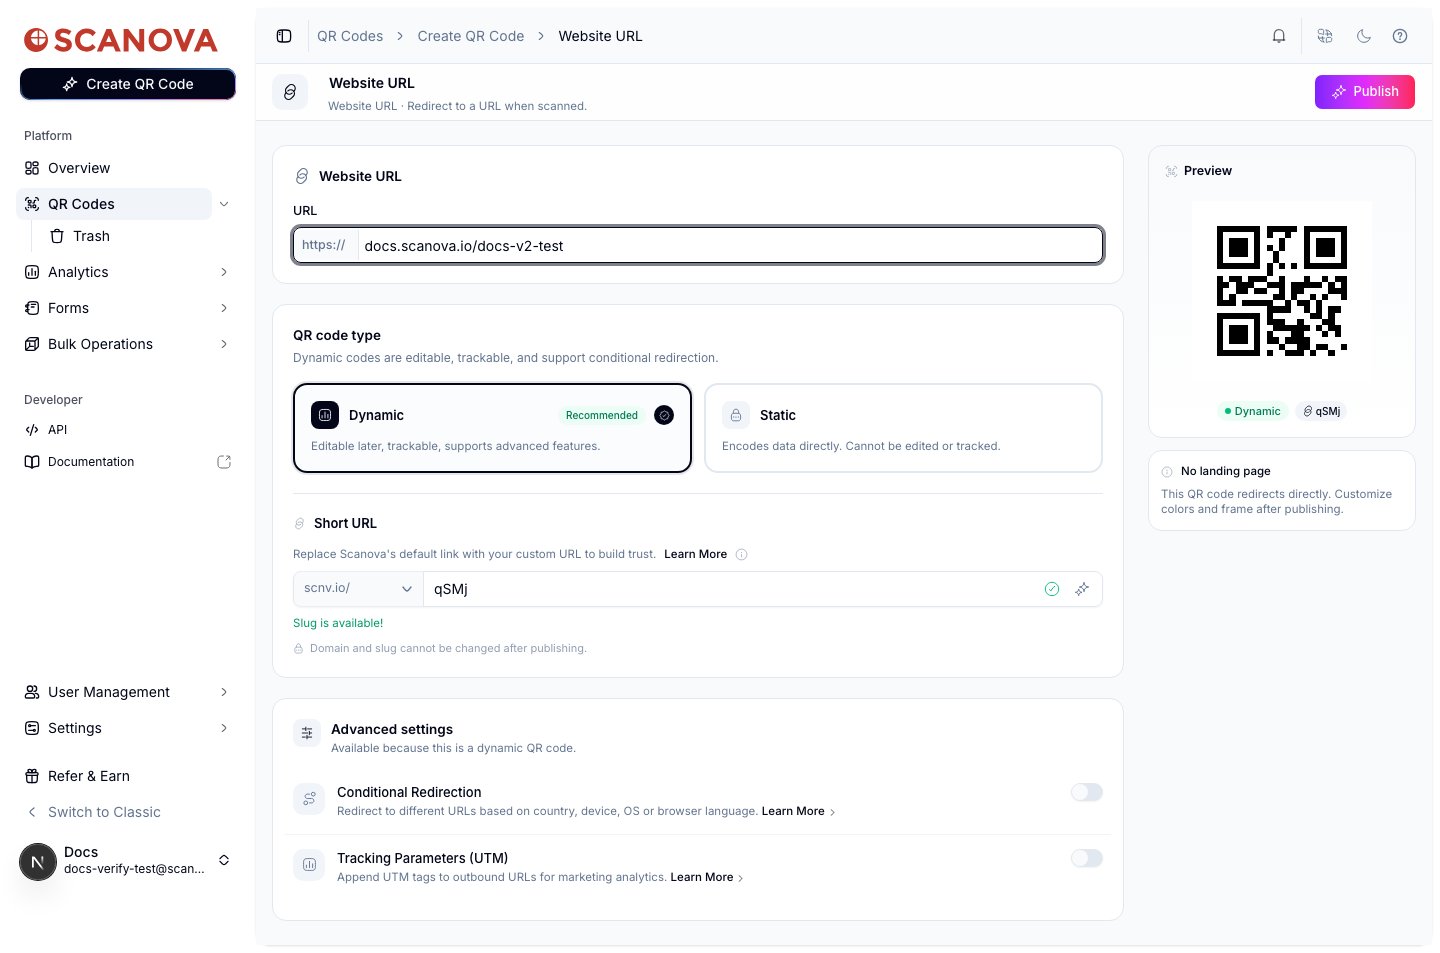 Leave **Dynamic** selected (it's the default and recommended) so the code stays editable and trackable after publishing. A **Short URL** slug is generated automatically — you can keep it or change it before publishing, since it can't be edited afterward.
Click **Publish** in the top-right. A drawer opens with a live preview of the QR code and an editable name — rename it here if you want something more specific than the default. Click **Publish** again in the drawer to confirm.
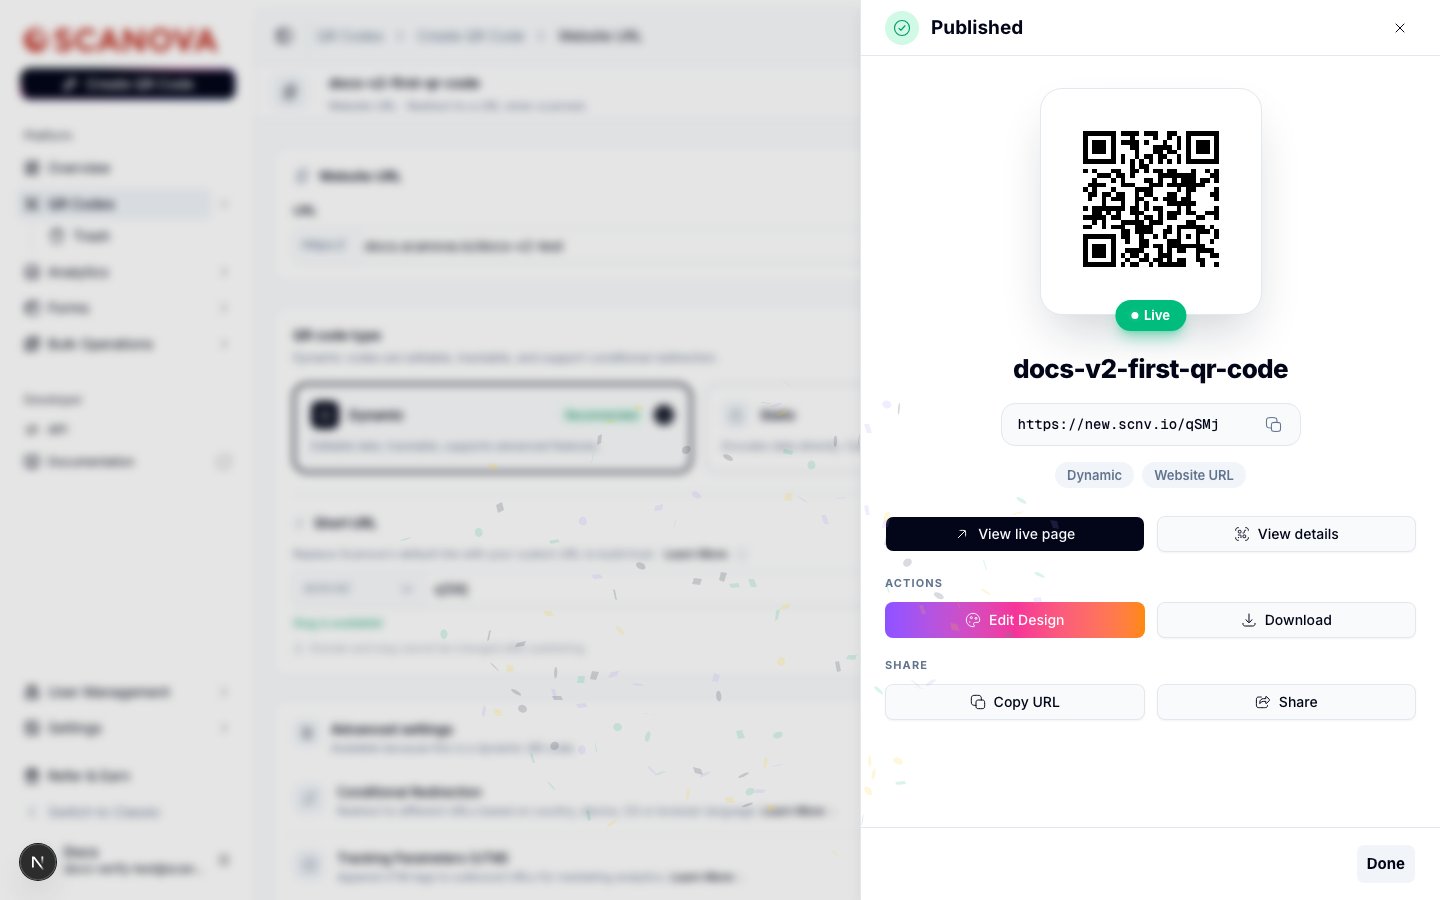
A **Published** confirmation appears with the final QR code, its short URL, and quick actions.
Leave **Dynamic** selected (it's the default and recommended) so the code stays editable and trackable after publishing. A **Short URL** slug is generated automatically — you can keep it or change it before publishing, since it can't be edited afterward.
Click **Publish** in the top-right. A drawer opens with a live preview of the QR code and an editable name — rename it here if you want something more specific than the default. Click **Publish** again in the drawer to confirm.
A **Published** confirmation appears with the final QR code, its short URL, and quick actions.
 ## What you get
The published code redirects instantly to the URL you entered — there's no landing page to design, since Quick Codes are direct-action. From the confirmation drawer you can download the QR image, copy or share its short URL, or open **Edit Design** to restyle the code's colors and frame. The code itself now appears in **QR Codes** in the sidebar, where you can search, tag, or move it into a folder.
If you'd rather build a branded landing page instead of a direct redirect, see [Quick Code vs. full Page](/qr-codes/create/quick-code-vs-page) for how to choose, and the [Page Builder overview](/page-builder/overview) for the block-based editor.
## Creating one via the API
The same Website URL QR code can be created through the API using category ID `1` (labeled **Website URL**). See [Create QR Code](/v1/api-reference/endpoint/qr_manager/create) for the full request schema.
## Related
* [Website URL QR Code](/qr-codes/create/website-url) — a closer look at the Quick Code type used in this walkthrough.
* [Quick Code vs. full Page](/qr-codes/create/quick-code-vs-page) — how to choose between a direct-action code, a full Page, and AI Studio.
* [Folders, tags & bulk operations](/qr-codes/manage/folders-tags-bulk-operations) — what to do next: organize the QR code you just published.
* [Dashboard overview](/getting-started/dashboard-overview) — a tour of the Overview page you land on after logging in.
## What you get
The published code redirects instantly to the URL you entered — there's no landing page to design, since Quick Codes are direct-action. From the confirmation drawer you can download the QR image, copy or share its short URL, or open **Edit Design** to restyle the code's colors and frame. The code itself now appears in **QR Codes** in the sidebar, where you can search, tag, or move it into a folder.
If you'd rather build a branded landing page instead of a direct redirect, see [Quick Code vs. full Page](/qr-codes/create/quick-code-vs-page) for how to choose, and the [Page Builder overview](/page-builder/overview) for the block-based editor.
## Creating one via the API
The same Website URL QR code can be created through the API using category ID `1` (labeled **Website URL**). See [Create QR Code](/v1/api-reference/endpoint/qr_manager/create) for the full request schema.
## Related
* [Website URL QR Code](/qr-codes/create/website-url) — a closer look at the Quick Code type used in this walkthrough.
* [Quick Code vs. full Page](/qr-codes/create/quick-code-vs-page) — how to choose between a direct-action code, a full Page, and AI Studio.
* [Folders, tags & bulk operations](/qr-codes/manage/folders-tags-bulk-operations) — what to do next: organize the QR code you just published.
* [Dashboard overview](/getting-started/dashboard-overview) — a tour of the Overview page you land on after logging in.