> ## Documentation Index
> Fetch the complete documentation index at: https://docs.scanova.io/llms.txt
> Use this file to discover all available pages before exploring further.
# QR code scheduling
> Schedule when a QR code activates or expires.
## What QR scheduling controls
QR scheduling lets a dynamic QR code turn itself on and off automatically, without you having to remember to flip a switch on launch day or after a campaign ends. It's built from **two independent rules**, not a single start/end date range:
* An **Activation Rule** — when the QR code should become active.
* A **Deactivation Rule** — when the QR code should stop being active.
You can set either one on its own, both together, or neither. They aren't linked to each other: setting an activation date doesn't require a deactivation date, and vice versa.
Live UI wording: the row is labeled **QR scheduling**, with helper text **"Automatically activate and deactivate by date."** Expanding it shows two separate cards, **Add Activation Rule** and **Add Deactivation Rule**, each with its own **Add** button — confirming these are two independent rules rather than one date range.
## Setting an activation rule
Open the QR code and go to **Settings**. Under **Targeting & Lifecycle**, find **QR scheduling** and select it to expand the section.
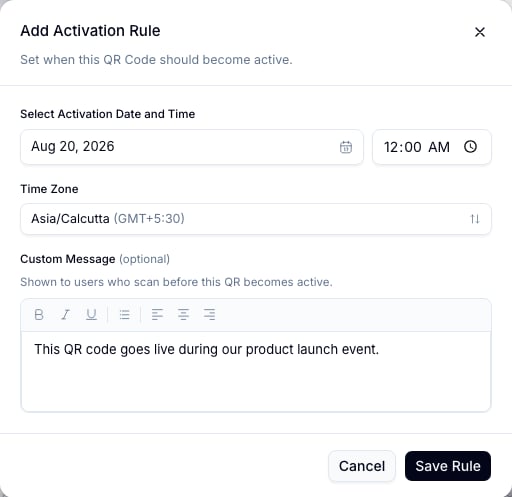
In the **Add Activation Rule** card, select **Add**.
In **Select Activation Date and Time**, pick a date and a time. The **Time Zone** field defaults to your browser's local time zone (for example, `Asia/Calcutta (GMT+5:30)`) and can be changed.
The date picker only allows **future** dates and times for an activation rule — past days are disabled, and picking today with a time that has already passed is rejected with "Activation date and time must be in the future." Deactivation rules have no such restriction (see below).
**Custom Message (optional)** is shown to visitors who scan the QR code *before* the activation date/time arrives. Leave it blank to fall back to the product's default text, "This QR Code has not been activated yet...".
Select **Save Rule**. The **QR scheduling** row switches to **On**, and the QR code's details panel shows a **Scheduled** status with the activation date.
 ## Setting a deactivation rule
The **Add Deactivation Rule** card next to it works the same way, with its own **Add** button:
In the **Add Deactivation Rule** card, select **Add**.
Pick a **Select Deactivation Date and Time** and confirm the **Time Zone**.
Unlike the activation rule, the deactivation date picker does **not** block past dates — you can pick a date that has already passed. Doing so expires the QR code immediately once you save, so double-check the date before saving if you don't want that.
**Custom Message (optional)** is shown to visitors who scan the QR code *after* it has expired. The default fallback text is "This QR Code is no longer active...".
## Setting a deactivation rule
The **Add Deactivation Rule** card next to it works the same way, with its own **Add** button:
In the **Add Deactivation Rule** card, select **Add**.
Pick a **Select Deactivation Date and Time** and confirm the **Time Zone**.
Unlike the activation rule, the deactivation date picker does **not** block past dates — you can pick a date that has already passed. Doing so expires the QR code immediately once you save, so double-check the date before saving if you don't want that.
**Custom Message (optional)** is shown to visitors who scan the QR code *after* it has expired. The default fallback text is "This QR Code is no longer active...".
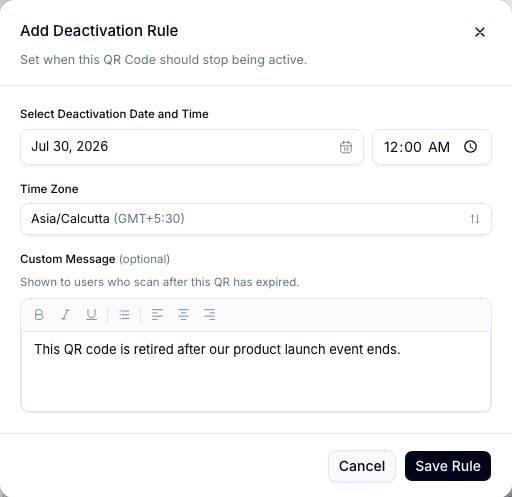 Select **Save Rule**.
## What visitors see outside the scheduled window
Before the activation date/time (if an activation rule is set) or after the deactivation date/time (if a deactivation rule is set), scanners see the custom message you configured instead of the QR code's normal destination. These messages are plain informational text — they don't redirect to a different URL. If you need scanners sent to a different destination based on conditions like country or device (rather than a fixed message), that's a separate feature; see [Conditional redirection](/qr-codes/manage/conditional-redirection).
## Editing or removing a rule
Once a rule is saved, its card shows the configured date, time zone, and a **Scheduled** status badge, with **Edit** and **Remove** links. Select **Edit** to reopen the same modal pre-filled with the current values, or **Remove** to delete the rule and turn that half of the schedule back off.
## Related
* [Conditional redirection](/qr-codes/manage/conditional-redirection) — routes visitors to different URLs based on who's scanning, rather than when.
* [GPS & geofencing](/qr-codes/manage/gps-geofencing) — another Settings-tab restriction, based on location instead of time.
* [QR Health Center](/qr-codes/manage/qr-health-center) — flags QR codes currently outside their scheduled window.
Select **Save Rule**.
## What visitors see outside the scheduled window
Before the activation date/time (if an activation rule is set) or after the deactivation date/time (if a deactivation rule is set), scanners see the custom message you configured instead of the QR code's normal destination. These messages are plain informational text — they don't redirect to a different URL. If you need scanners sent to a different destination based on conditions like country or device (rather than a fixed message), that's a separate feature; see [Conditional redirection](/qr-codes/manage/conditional-redirection).
## Editing or removing a rule
Once a rule is saved, its card shows the configured date, time zone, and a **Scheduled** status badge, with **Edit** and **Remove** links. Select **Edit** to reopen the same modal pre-filled with the current values, or **Remove** to delete the rule and turn that half of the schedule back off.
## Related
* [Conditional redirection](/qr-codes/manage/conditional-redirection) — routes visitors to different URLs based on who's scanning, rather than when.
* [GPS & geofencing](/qr-codes/manage/gps-geofencing) — another Settings-tab restriction, based on location instead of time.
* [QR Health Center](/qr-codes/manage/qr-health-center) — flags QR codes currently outside their scheduled window.