Publishing a page: what the Publish step actually does, how a draft differs from a live page, and how to push later changes to a page that is already live now.
Your landing page has two states: draft and published. You can make as many changes as you like to the draft without affecting what visitors see. When you’re ready, you publish it.
State
Description
Draft
Your current work in progress. Saved automatically. Only visible to you in the builder.
Published
The version visitors see when they scan the QR Code. Updated only when you publish.
Changes save automatically as you work — but this is not just a local browser draft. Within a few seconds of your very first edit, the header status cycles “Unsaved” → “Saving…” → “Saved”, and a real POST /qr/ request creates and persists the QR Code record on the server — before you’ve clicked Publish at all. Every edit after that keeps the draft saved server-side the same way.
Because autosave is server-backed, you don’t need to worry about losing work if you close the tab or your browser crashes — your draft is already saved to your account, not just to local storage.
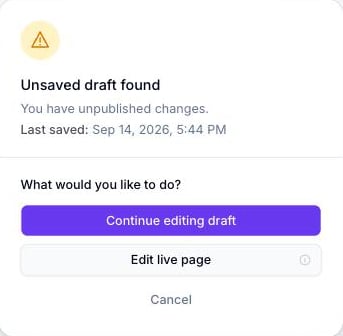
If you have unpublished changes and reopen the editor for that QR Code (including via Edit Page), the builder detects that the draft is newer than the last published version and asks what you’d like to do.
The unsaved-draft prompt shown when reopening a page with unpublished changes
Choose Continue editing draft to pick up where you left off, or Edit live page to start from the last published version instead.
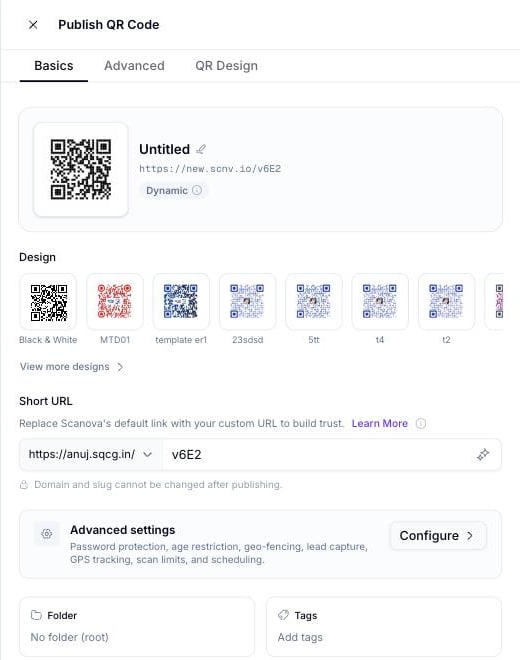
Click Publish in the top-right of the header. This opens a Publish QR Code panel — not a simple confirmation dialog — with Basics, Advanced, and QR Design tabs, a live QR Code preview, an editable name and Short URL/slug, a folder picker, and tags.
The Publish QR Code panel — Basics tab
2
Review and confirm
Adjust the name, slug, folder, or tags if needed, then click Publish at the bottom of the panel.
3
Wait for the success state
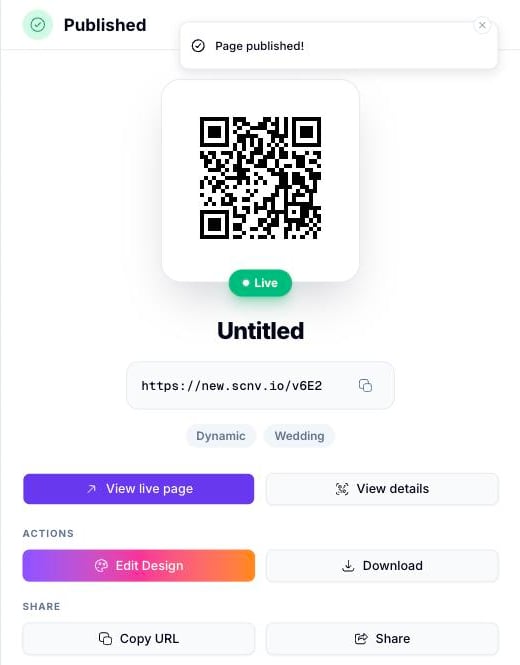
The header shows Publishing… for a few seconds, then Published ✓. A success panel appears with a Live badge, the QR Code, its live URL, and quick actions (View live page, View details, Edit Design, Download, Copy URL, Share).
The success panel shown right after publishing
Publishing takes only a few seconds. Once it completes, anyone who scans the QR Code sees the new version immediately.
The QR Code’s live URL serves the updated page; the QR Code image itself never changes
You can keep editing in the builder without affecting the live page — your next changes become a new draft
Republishing works the same way each time: make changes, click Publish (the button reads Update live page once a page has unpublished changes since its last publish), and confirm
After publishing, view the live page by scanning the QR Code, or by clicking View live page from the success panel or the QR Code’s detail page.
Always verify the live page on a real mobile device after major layout changes — the canvas preview is accurate, but a real device test is the most reliable check.
Page-builder QR Codes are created the same way as other landing-page categories through the API — see Create QR Code for the request schema.