QR Code scheduling lets a dynamic QR Code turn itself on and off automatically, without you having to remember to flip a switch on launch day or after a campaign ends. It’s built from two independent rules, not a single start/end date range:
An Activation Rule — when the QR Code should become active
A Deactivation Rule — when the QR Code should stop being active
You can set either one on its own, both together, or neither. They aren’t linked to each other: setting an activation date doesn’t require a deactivation date, and vice versa.
Live UI wording: the row is labeled QR Code scheduling, with helper text “Automatically activate and deactivate by date.” Expanding it shows two separate cards, Add Activation Rule and Add Deactivation Rule, each with its own Add button — confirming these are two independent rules rather than one date range.
Open the QR Code and go to Settings. Under Targeting & Lifecycle, find QR Code scheduling and select it to expand the section.
2
Add an activation rule
In the Add Activation Rule card, select Add.
3
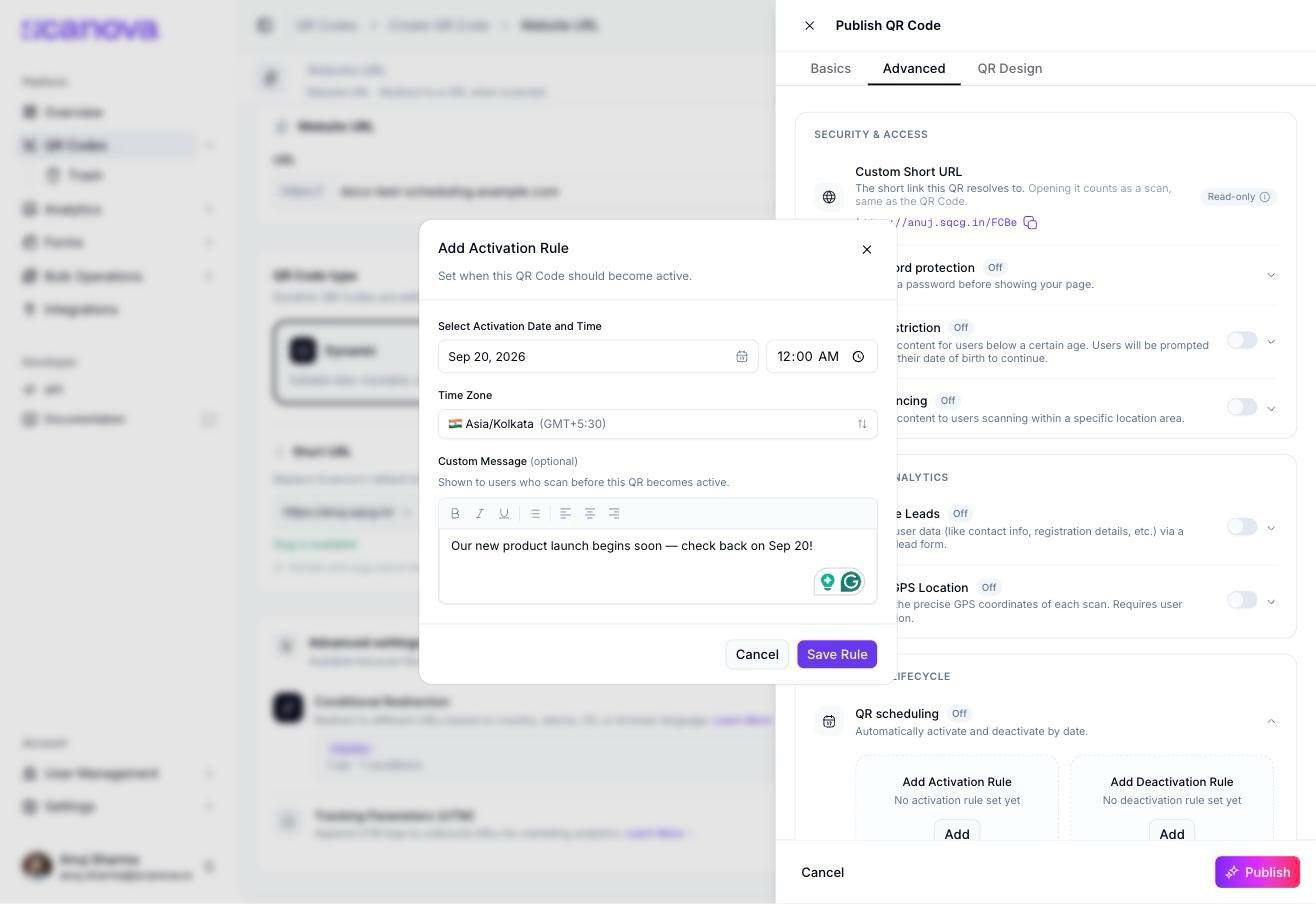
Set the activation date, time, and time zone
In Select Activation Date and Time, pick a date and a time. The Time Zone field defaults to your browser’s local time zone (for example, Asia/Kolkata (GMT+5:30)) and can be changed.
The date picker only allows future dates and times for an activation rule — past days are disabled, and picking today with a time that has already passed is rejected with “Activation date and time must be in the future.” Deactivation rules have no such restriction (see below).
4
Add an optional custom message
Custom Message (optional) is shown to visitors who scan the QR Code before the activation date/time arrives. Leave it blank to fall back to the product’s default text, “This QR Code has not been activated yet…”.
5
Save the rule
Select Save Rule. The QR Code scheduling row switches to On, and the QR Code’s details panel shows a Scheduled status with the activation date.
Add Activation Rule, filled in with a future date, time zone, and custom message
The Add Deactivation Rule card next to it works the same way, with its own Add button:
1
Add a deactivation rule
In the Add Deactivation Rule card, select Add.
2
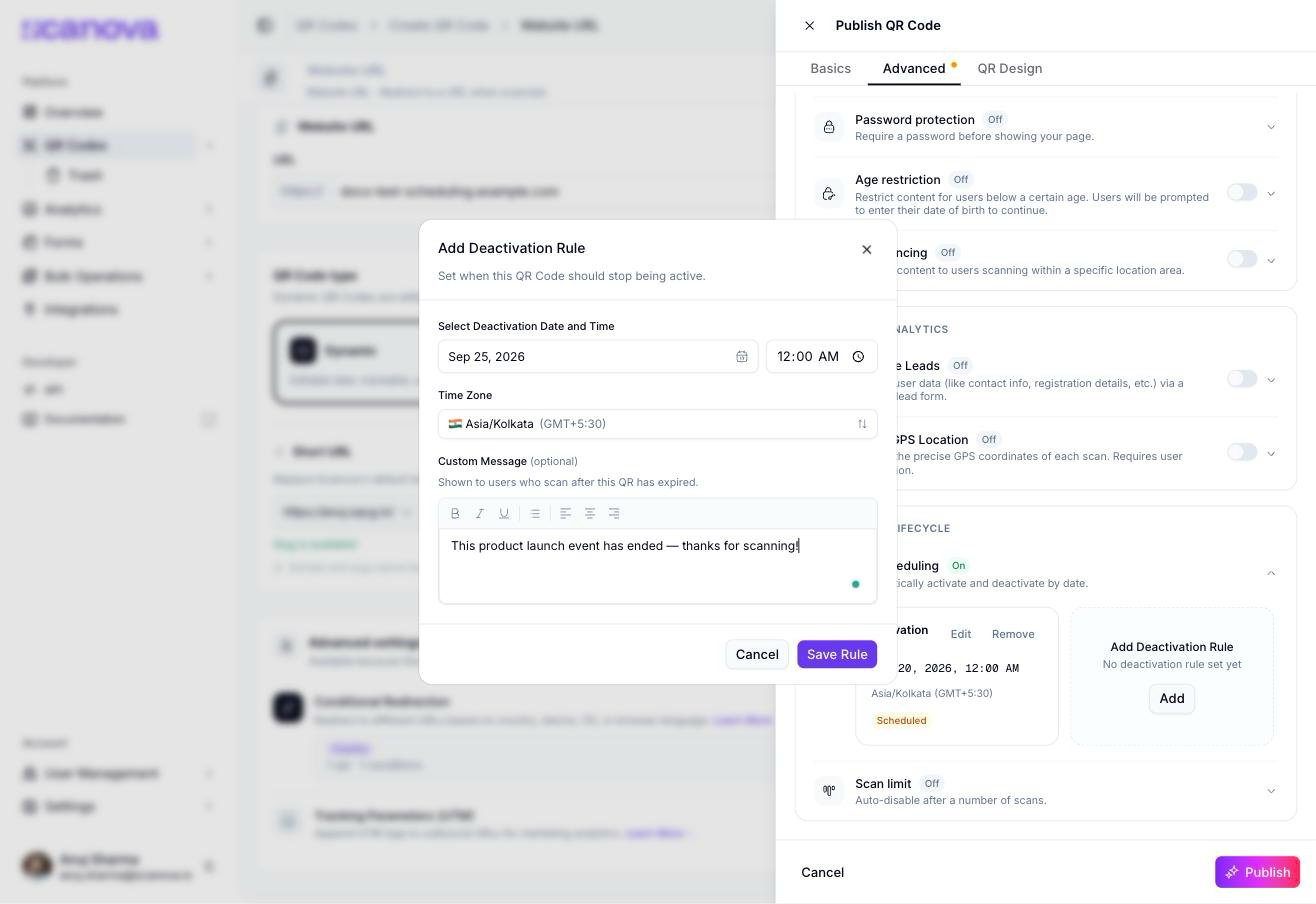
Set the deactivation date, time, and time zone
Pick a Select Deactivation Date and Time and confirm the Time Zone.
Unlike the activation rule, the deactivation date picker does not block past dates — you can pick a date that has already passed. Doing so expires the QR Code immediately once you save, so double-check the date before saving if you don’t want that.
3
Add an optional custom message
Custom Message (optional) is shown to visitors who scan the QR Code after it has expired. The default fallback text is “This QR Code is no longer active…”.
Add Deactivation Rule, filled in with a date, time zone, and custom message
Before the activation date/time (if an activation rule is set) or after the deactivation date/time (if a deactivation rule is set), scanners see the custom message you configured instead of the QR Code’s normal destination. These messages are plain informational text — they don’t redirect to a different URL. If you need scanners sent to a different destination based on conditions like country or device (rather than a fixed message), that’s a separate feature; see Conditional redirection.
Once a rule is saved, its card shows the configured date, time zone, and a Scheduled status badge, with Edit and Remove links. Select Edit to reopen the same modal pre-filled with the current values, or Remove to delete the rule and turn that half of the schedule back off.